
Lately many are realizing the physical and mental health benefits of Yoga, a good old method that has a history of thousands of years. The benefits of yoga are not only on the physical body but also improves Mental health. Hence you will get two-in-one benefits by practicing yoga on a regular basis.
Another important thing is, you can start practicing yoga right at your home without needing a trainer or specialist. Irrespective of gender and age, every other person can adopt this spiritual way of exercising to maintain better health.
Comparison of Yoga and Gym
When people decide to start exercises they often get confused between Gym and Yoga. Please note both are completely different forms of exercise. Gym exercises are physical activities whereas Yoga strengthens both mind and body.
You can choose either Gym or Yoga depending on your goal or can perform both at a time.
Here is the comparison between the Gym and Yoga;
- Gym exercises are to shape the physical body whereas Yoga helps with both physical and mental stability.
- Yoga Asanas are effective for the entire body. In the case of gym exercises, the activities are meant to concentrate on a single part of the body.
- Yoga helps to improve the immune system of the body.
- Yoga boosts the positivity and energy of the soul. Gym exercises are heavy and make the person feel tired.
- Gym exercises such as losing belly fat need heavy tools hence it is difficult to perform them at home. Where as Yoga doesn’t need any tool or accessories hence can be performed anywhere, anytime!
Yoga For Beginners
As already stated Yoga can be started right at your home. All you need is basic knowledge about Yoga, Asanas, and consistency. You can start with basic, easy Asanas and gradually increase the difficulty level.
For better practice, it is always recommended to start the routine with SuryaNamaskar. Surya Namaskara is a process of saluting the Sun by performing 12 Asanas in sequence. Completion of 12 Asanas is considered as one Surya Namakskara thus you can start with 30 Surya Namaskaras every day. It is more effective when you perform these Asanas during Sun Rise. Surya Namaskara has lots of benefits some of them are quick and easy ways to get rid of belly fat, helps to improve skin health etc.
How Many Yoga Asanas Exists?
According to Hatharatnavali, there are a total of 84 Asanas exist in Yoga each one having its own health benefits.
Ustrasana, Adho Mukha Svanasana, Dhanurasana, Matsyasana and Malasana are few Yoga asanas known to reduce period cramps and regulate the cycle.
To improve skin health and avoid most common skin care mistakes you can practice Adho Mukha Svanasana, Padmasana, Dhanurasana, Halasana, Sarvangasana and Shavasana.
Performing Surya Namaskar early morning helps you lose belly fat and thus overall body weight can be reduced by the regular practice of Surya Namaskara.
Dandasana, Tadasana, Baddha Konasana, Marjariasana, Sukhasana, Janu Sirsasana, and Shavasana are some of Yoga Asana to practice during pregnancy thus helping to be safe from dangerous pregnancy symptoms.
Thus for every kind of health problem, there exists a Yoga Asana to help improve health. By practicing Yoga, you can gain one or other benefits. Then why not make it a routine in order to achieve better mental and physical health?
Let’s look at a few asanas which can be easily practiced at home,
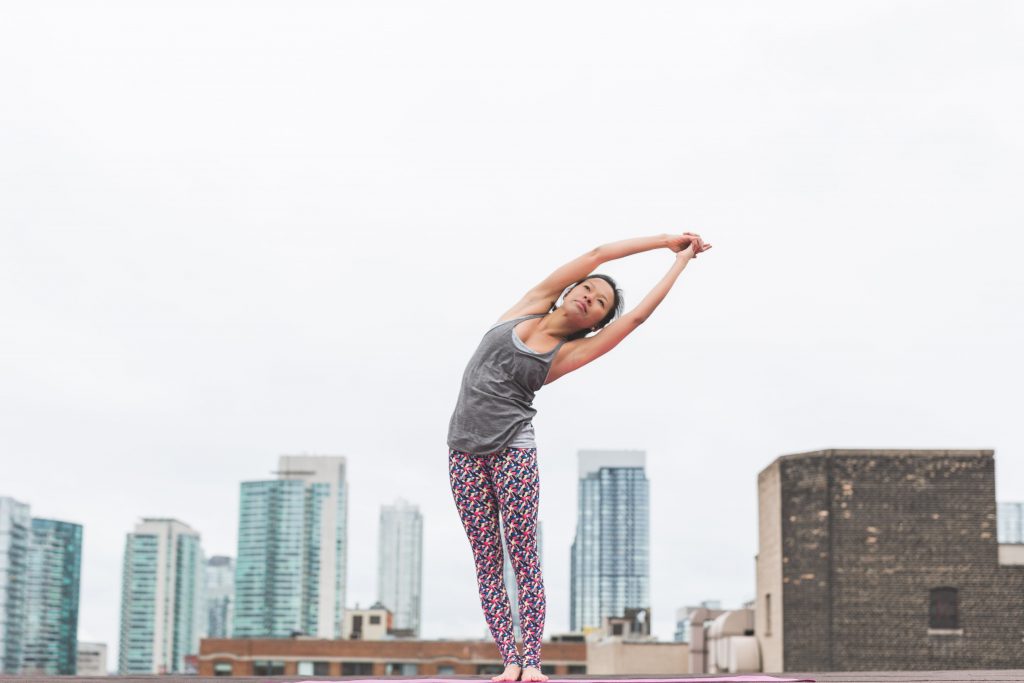
1) Indudalasana (Standing Crescent Pose)
Indudalasana can be broken as Indi-Dala-Asana. Indu Dala means crescent hence the pose resembles the crescent moon.
Indudalasana is standing Yoga that can be done easily by following the instructions. Remember Most of the standing Asanas start with Tadasana (Mountain Pose).
Instructions
- Stand straight with big toes touching each other and heels slightly apart.
- Spread the toes, leave hands free at the sides, and make sure knees are not touching each other.
- The above steps complete Tadasana (For the next asanas these steps have to be followed when mentioned as Tadasana).
- Inhale, join both hands slowly by raising them upwards and stretch up as much as possible.
- Keep the hands straight and Lock the fingers.
- Slowly exhale and start bending on one (left or right) side.
- Bend as much as possible without bending your elbows and knees.
- Concentrate on the hips, upper leg muscles, and make sure the weight resides on heels.
- Stay in this position for 30-40 secs depending on your stretching capacity.
- Inhale and exhale, release the posture in the reverse order.
Indudalasana helps to strengthen the abdomen, spinal cord, and buttocks. Mentally, Indudalasana improves balance and stability.
2) Garuda Asana (Egle Pose)
Garuda means Eagle. Garuda is one of the strongest creatures in Indian mythology.
Garudasana looks tricky in the pictures but it is much easy when you perform by following the instructions mentioned below.
Remember, all the Asanas has to be performed by following step by step guide. Jumping into the final step by skipping intermediate steps won’t yield any benefits and may lead to muscle cramps.
Instructions
- Stand in Tadasana.
- Stretch your arms forward in parallel with the earth. Make sure your hands are facing down.
- Slowly bend your knees and transform all the body weight to the left foot.
- Cross right thigh over the left. Lock both the thighs tightly.
- Bring the right hand behind the left calf.
- Keep your right hand underneath, wrap the elbows and wrists.
- Transform weight on the hips by intimidating the sitting position.
- Inhale and exhale slowly.
- Release the posture after 30 to 60 seconds in reverse order.
Garudasana improves balance and coordination. It stretches hips hence is good for people who are trying to lose the weight of the lower body.
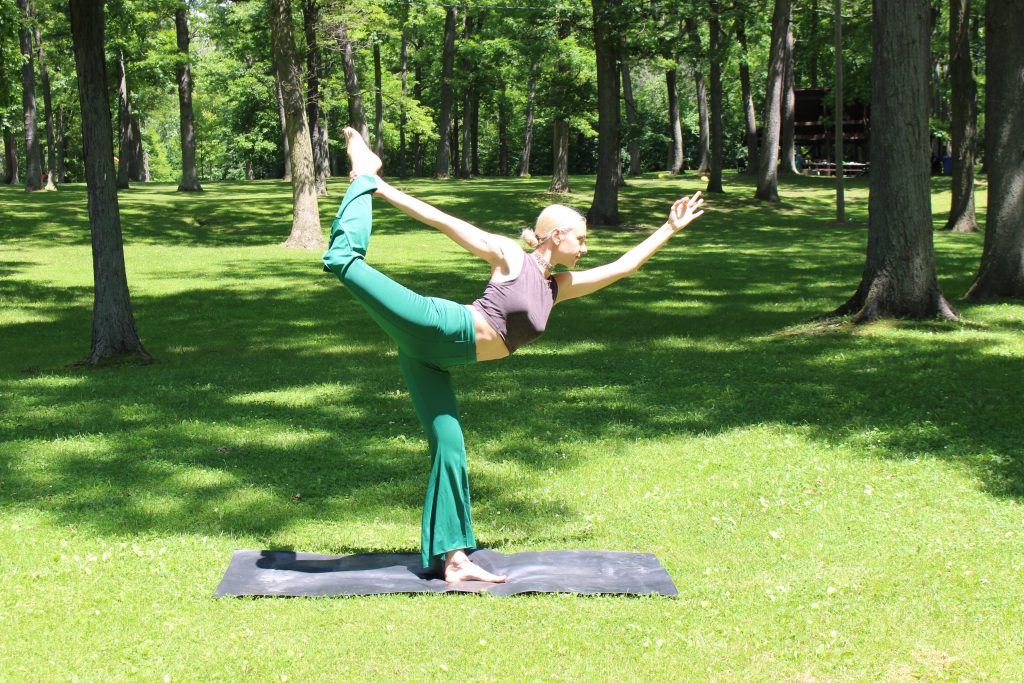
3) Nataraj Asana (Dancer Pose)
Derived from the Indian classical Bharatanatyam, Natarajasana is a standing yoga asana with lots of health benefits. Nataraja can be broken as Nata-Raja where Nata means dancer and Raja means King.
Please warm up your body before performing any Asana. Pranayama calms the mind hence it is good to start Yoga with Pranayama and basic poses such as Tadasana, Bhujangasana etc.
Instructions
- Stand in Tadasana.
- Shift the weight onto the right leg, bend the left knee, and grab the ankle with the left hand.
- Make the Vayu Mudra with right-hand fingers and raise it slowly towards the ceiling.
- Press the left foot on hand and at the same time start raising toes towards the ceiling.
- This process makes your upper body bend.
- Bend right thigh is parallel with the ground or higher.
- Make sure the right-hand fingers are still in Vayu Mudra’s position and pointed to the sky in a straight position.
- Once after achieving the position relax the shoulders and exhale.
- Inhale and Exhale
- Slowly release the posture in reverse order after 30 to 60 seconds.
Nataraj Asana involves long stretching of both legs and hands. Hence muscles in these areas get flexible and strong by regular practice. This Asana strengthens the Spinal Cord hence Nataraj Asana is good for people with back pain.
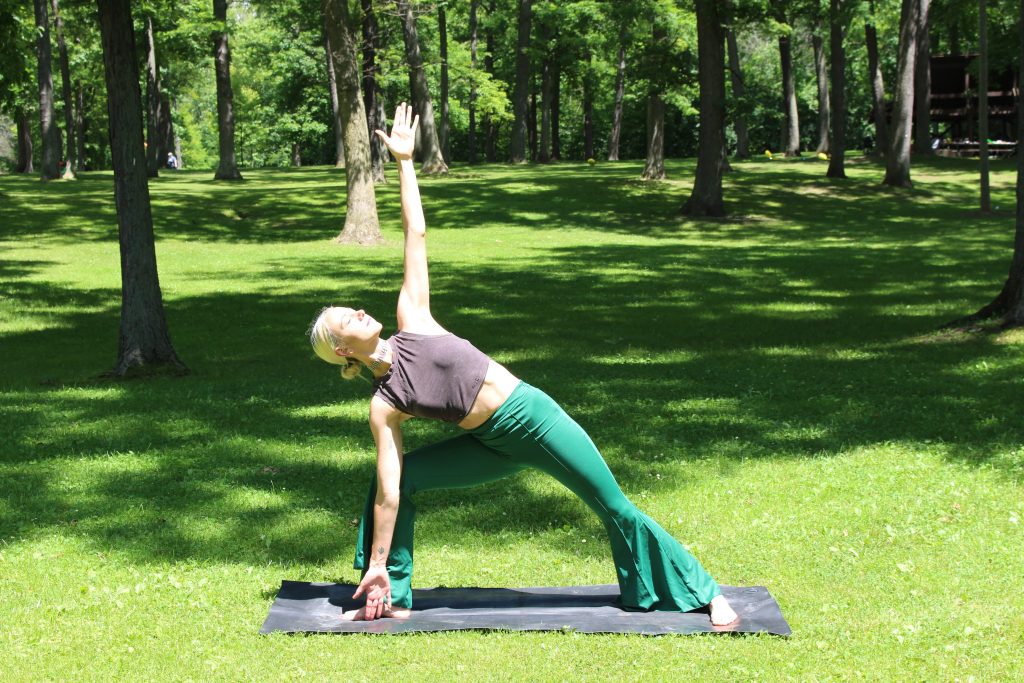
4) Parvartita Trikonasana (Twisted Triangle Pose)
Parvartita-Trikona-Asana is one of the standing Yogasana where Paravartita means revolve (to turn around) and Trikona means triangle.
Remember this is one of the difficult Asanas and needs lots of practice. Attempting to perform this pose without prior knowledge or training may cause injury.
Instructions
- Stand in Tadasana.
- Stretch the left leg without bending the knee.
- Make sure the distance between feet is 4-5 meters and heels are in parallel with each other.
- Slowly turn the left foot to make 45 deg toward the right leg.
- Turn right feet outwards (opposite to the left leg) making a 90 deg angle.
- Spread the weight on both legs, stand firm, and lock your knees.
- Relax by taking slow breaths.
- Now slowly spread both hands parallel to the ground (make a straight line using both hands). Make sure you are looking at the front view.
- Now is the time to revolve. Slowly revolve your upper body in the right direction. Make sure the left knee is not bending and both legs are still in the same position.
- Bring down the hands and keep them on the waist.
- Now lift the left hand (right hand still resting) towards the ceiling. Stretch as much as possible.
- With that stretched hand bend down until you can touch the right ankle. Hold it tightly.
- Now, look at the ceiling keeping all other parts exactly where they are supposed to be.
- Stand in this position for up to 30 seconds to a minute.
- Inhale and Exhale slowly and release the posture after 30 to 60 seconds.
Parvartita Trikonasana strengthens the hip muscles, activates both the shoulders, helps to gain balance and stability. Since the entire body is stretched as part of this Asana, Parvartita Trikonasana is a great way to strengthen the whole body. This Asana also helps to improve the digestive system and metabolism.
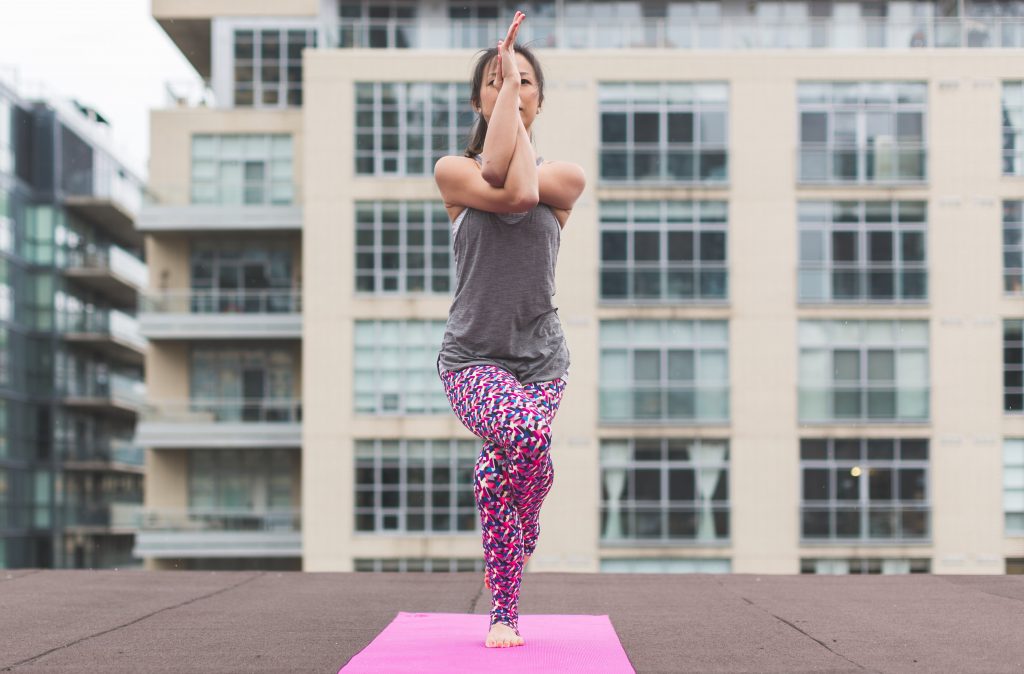
5) Vrukshasana (The Tree Pose)
Vrukshasana is Vruksha- Asana where Vruksha means Tree and Asana means Pose. It is one of the standing Yoga Asana that can be easily performed by beginners.
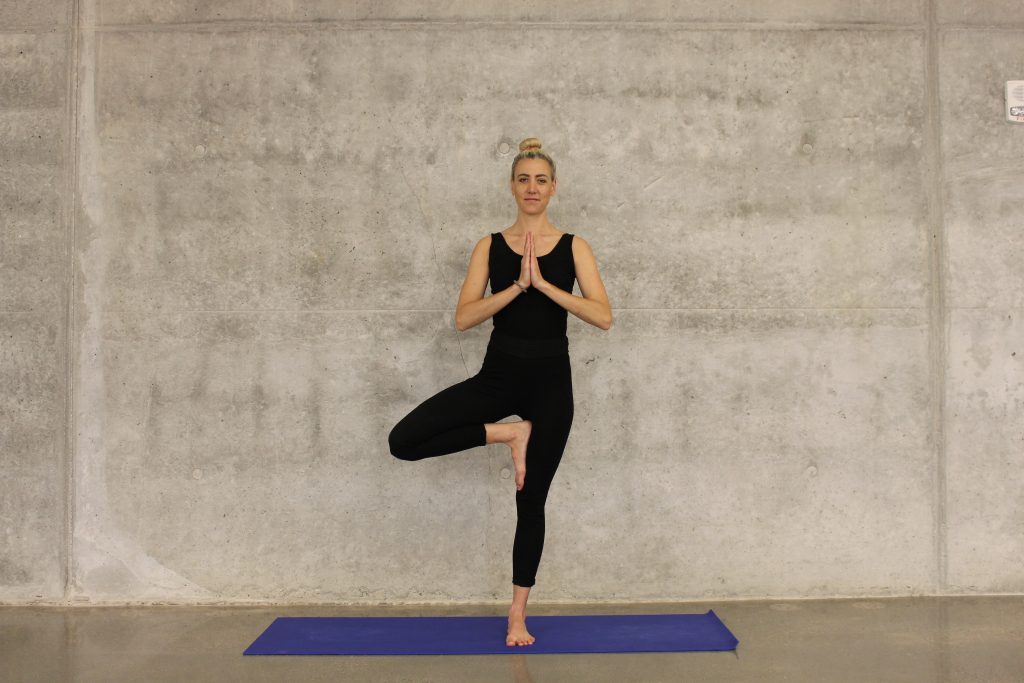
Instructions
- Stand in Tadasana.
- Transfer weight into the left leg and bend your right knee to place the right foot sole on the left thigh.
- The right foot should be pressing against the left thigh.
- Achieve balance with the left leg.
- Relax, Inhale, slowly lift your hands and stretch as much as possible.
- Place the palms in Namaskara Mudra.
- Keep your whole body straight while you gaze at the distant view.
- Inhale and Exhale. Slowly release the posture after 30 to 60 seconds.
Vrukshasana helps with the stability and balance of the legs. It also can strengthen hips and feet with regular practice.
6) Eka Pada Rajakapotasana (One-Legend King Pigeon Pose)
Remember, the initial position is the very base of this Asana which helps to sit in this pose for a longer time. Before performing this Asana warm up your body with other simple Asanas and Pranayama.

Instructions
- Sit by stretching your right leg and left leg knee bending in front of you.
- The right leg should be free to stretch for further process.
- Spread your hips, sit comfortably, inhale and exhale for few seconds.
- Now lift your right leg.
- Slowly move your right hand towards the right leg.
- Hold the inside of the right leg feet with the right hand.
- This stretches your muscles in the abdominal obliques and opens the chest.
- While holding the right leg with your right hand slowly bring it towards your head simultaneously tilting your hand towards the right leg.
- Inhale and Exhale. Slowly release the posture after 30 to 60 seconds.
By opening the hip joint, Pigeon Pose improves hip flexibility. It helps to get rid of lower back pain by making it stiffer.
7) Bhujangasana (Cobra Pose)
Bhungasana is Bhujanga-Asana. In Sanskrit, Bhujang means snake hence the name cobra is given to this pose because it resembles the snake raised its hood.

Instructions
- Lie on your stomach, rest hands on the ground with palms facing upwards and straighten the whole body.
- Lift your chin to place it on the ground and look straight.
- Now bring the hands to shoulders by bending the elbows and resting the palms on the surface.
- Now slowly start raising your chest by bending the spinal cord.
- Please note your lower body remains the same while you bend the upper body.
- Take the support of your hands and bend as much as possible.
- Slowly Inhale and Exhale. Release the posture after 30 to 60 seconds.
Bhunjangasana helps to stretch the shoulders, chest, abdomen, and lungs. Hence it stimulates abdominal organs, improves breathing by opening hearts and lungs. It also strengthens the spinal cord.
8) Ardha Matsyendrasana (Half Lord-of-the-Fishes Pose)
In Ardha Matsyendrasana (Matsya+Indra+Asana), Ardha means half, Matsya means Fish and Indra is the name of the lord. How the name is derived is really a long and interesting story! In this pose, half of the spinal cord will be twisted benefitting the muscles of the lower back.
Instructions
- Sit on the ground with your legs extended and hands kept behind your back.
- Bend the left leg in such a way that the feet should be below (against) your right thigh.
- Stretch the right leg as shown in the picture.
- Slowly twist your neck and then shoulders and then waist towards the right.
- Keep the left hand on the right thigh and right leg straight to the shoulder.
- Keep the spinal straight and look directly in front of you.
- Inhale, exhale and then release the posture after 30 to 60 seconds.
Ardha Matsyendrasana opens hips and shoulders. It strengthens the spine and also improves digestion. It is also said that Ardha Matsyendrasana helps to clean internal organs.
9) Ardha Kurmasana (Half Tortoise Pose)
Ardha Kurmasana is Ardha-Kurma-Asana. Ardha means half, Kurma means tortoise, and pose means Asana. It is one of the main Asana in Bikram Yoga hence it is supposed to be practiced in a hot and humid room.
Instructions
- Sit on your hips by straightening your legs and looking at the front view.
- Now bend both legs.
- Touch the ground with the right thigh by bending the knee completely.
- Keep Right leg in front of the left knee, keep your left hand behind your hips with the palm facing upwards.
- Now slowly lift the right hand bring it behind the left knee to hold your left foot.
- At this position, your whole body is twisted to the left with legs at their own position.
- Now slowly turn behind to look at the behind view. Keep your back straight.
- Keep taking deep breaths and release the posture after 30 to 60 seconds.
Ardha Kurmasana stretches back, shoulders, and hip. This asana is very good for mental health as it increases the blood flow to the brain.
All the above-mentioned Poses should be practiced by a healthy person. Avoid if you are facing any muscle injuries or pregnant or suffering from any other health problems. We also recommend performing these Asanas under the supervision of an expert or trainer.
